As COVID-19 skill building, I made a YouTube video! In the first of a series of videos I imagined while hiking the JMT, I present “How to JMT: Pack a Backpack”:
Future topics may include how to:
dig a cathole
prevent blisters
use your pack to level an uneven sleeping spot
You can read more about the gear I used on the JMT and my gear philosophy (totally not fussed) at this previous blog post.
It seems like long-distance hikers, thru-hikers, ultralight hikers and outdoorsy people in general like to talk about gear too much. I think this is because (1) it’s easier to shop for gear online than to actually go outside and train in preparation for an objective and (2) reviewing gear and talking about gear and wearing and raving about sponsor’s gear is how all the “influencers” make money.
I feel very ambivalent about people bandying around numbers about how big the outdoor industry is and how it should have more political clout. As much as I appreciate what Patagonia does in sponsoring creative endeavors like The Dirtbag Diaries and fighting for Bears Ears, I don’t think that we can spend our way out of the environmental crises, no matter how environmentally friendly your camp shoes are. What we need to do is what they used to teach in elementary school back in the 80’s, before environmental issues were so politicized — Reduce, Reuse, Recycle. (Patagonia realizes this too.)
The outdoor community in the United States is very white and very privileged. People often talk about camping and backpacking as if it is free! Outdoor gear is very expensive and obsession with the latest and lightest gear can make costs appear even more daunting and insurmountable for #unlikelyhikers just trying to get into the outdoors. Having the right gear is important. For example, having a sleeping bag that is warm enough and light enough and not too bulky will definitely be key to an enjoyable backpacking experience. But, shaving off a few grams from your pack weight by buying a $20 titanium spork?… Probably not necessary. (Full disclosure: I had said titanium spork and am still sad I lost it. Still hoping it will turn up.)
When I started putting together my backpacking gear in 2016, I did buy nice, fancy, lightweight “Big Three” — pack, shelter and sleeping bag — after intensively researching the interwebs. And, I have been really happy with those choices. However, the rest of my kit was developed over time by cobbling together stuff I already had (my tiny Thermos was initially purchased to be a purse Thermos for commuting to work) or by trying the cheapest option (I still use a BRS stove) and gradually buying more expensive pieces as I figured out what would actually enhance my quality of life on the trail, e.g. moving from a Chinese knock-off Thermarest Z-lite sleeping pad to a real insulated inflatable pad. If you are interested in putting together a beginner backpacking kit on the cheap, PMags’ blog is a great resource, as he says “[t]he best way to learn about backpacking is not discussing gear online or going to gear sales but is actually to get out there.”
Without further ado, here is my JMT gear list.
JMT Gear List
Big Three
Pack
ULA Circuit — My pack was once purple, but now it is faded to blue after a summer being used as my guide pack on the Matanuska Glacier. Many ice tools and ropes have been carried on the thing. Also good as a carry-on on planes. Super simple design but very functional, the only thing I have not been able to figure out how to do with this bag is rack a splitboard onto it.
Shelter
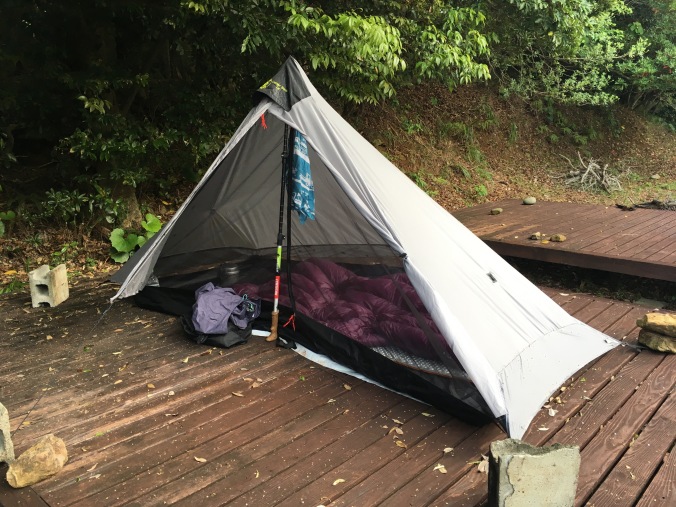
Six Moon Designs Lunar Solo — No tent poles so ultra squishable and packable. Uses one trekking pole. Large floor for spreading out gear. Not free standing, but I’ve never had an issue setting it up with rocks, and it sheds wind super well, better than a dome shaped tent.
Tent accessories: Tyvek ground sheet (purchased from SMD along with the tent), 8 stakes (assorted — bought the SMD tent stake set initially, but have lost some and cobbled together others over the years) and two short pieces of tent cord (2 meter and 3 meter) for guylines.
Sleeping System
Enlightened Equipment Revelation 20 Degree Down Quilt — This is literally the best thing I have ever purchased. It warms up super quick when it is cold, and unzips flat like a blanket when it is warm. The nylon shell is remarkably soft and comfortable. As an itinerant person, I sleep in this year round. I cannot go back to a sleeping bag. If forced to use a sleeping bag, I unzip it all the way down and use it like a quilt. In 2017, I was worried 20 degrees wouldn’t be warm enough and bought a sleeping bag liner and hated it. It twisted up around me negating all the wonderful things about a quilt. I’d rather just pack thicker long johns and my down parka to sleep in. Some people say quilts are drafty, but I think there is a lot of user error. The neck drawstring is key and you must wear a hat.
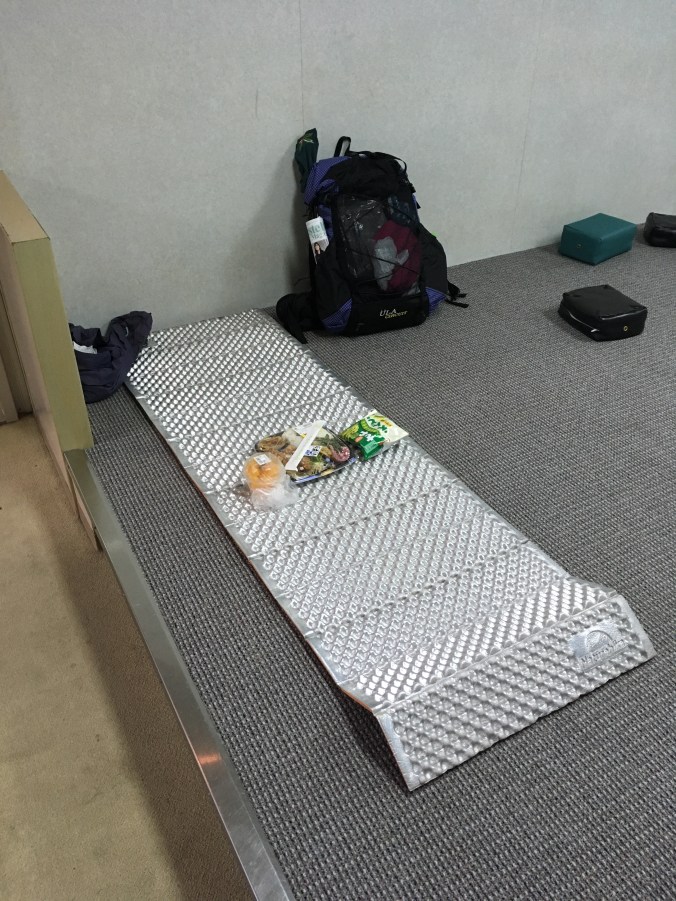
REI Co-op Flash Pad Regular — R Value of 3.7 at 15 oz and less than $100 when REI is having a sale. It’s been good so far. I purchased this after the JMT in 2017 after discovering that I cease to be able to sleep on a Thermarest Z-lite closed cell foam pad if temperatures drop below freezing, also sleeping on a Z-lite was messing up my hip flexors because they weren’t able to recover in the night. I will let you know about durability after this thru-hike attempt.
Sea to Summit Aeros Premium Pillow Regular — Fabric-y surface hides the fact that it’s just an inflatable pillow. When I started backpacking, I used extra clothes rolled up in a fleece jacket for a pillow. I purchased a pillow before the JMT in 2017 with the thought process, “If I have to wear all my clothes to sleep to stay warm, I won’t have a pillow.”
Gossamer Gear 1/8 inch Thinlight Foam pad – NEW! Trying this as a sit pad / yoga mat / extra sleeping pad protection/insulation / emergency sleeping pad in case inflatable pad springs a leak — I’m paranoid about leaks because last time I hiked the JMT, I was still super hard core and using an indestructible Thermarest Z-lite closed cell foam sleeping pad but it wasn’t warm enough once temps dropped below freezing.
What I looked like camping on the JMT in 2017. My quilt is draped over my tent to dry out a bit over breakfast before we pack up.
Clothing
Hiking Clothes (Worn)
Smartwool 150 T-shirt – NEW! Was going to slum it and wear any old synthetic T-shirt but splurged on a merino wool tee for its anti-stink quality. I have 7-day and 8-day stretches planned for this trek, which will be the longest I have ever been without a shower.
Montbell Chameese lightweight fleece jacket
Target sports bra and synthetic underwear
Northface Aphrodite Pants – Lightweight, quick drying, legs roll-up easily for stream crossings. I think it’ll be cool enough in September to prefer hiking in pants, and pants provide protection from brush and bugs.
Baseball cap
Sunglasses – random gas station, but polarized
Darn Tough Micro Crew socks – I used to have two pairs of Smartwool hiking socks, and two pairs of Smartwool ski socks, but the hiking socks wore out and I replaced them with two pairs of these Darn Tough hiking socks, which are just starting to show wear after 2 years of much more use than the Smartwool socks ever got. I still prefer Smartwool ski socks though.
Shoes – I currently own and hike in New Balance Leadville trail runners and Merrill Moab Mid GTX hiking boots. Not sure which I will want to wear and both are getting kind worn, but I think it is risky to break in new shoes now. Leaning toward the hiking boots for a bit more water resistance. I have just purchased new Superfeet insoles to put in which ever pair I choose.
Rain Gear
Outdoor Research Women’s Aspire Jacket – I have a pretty uncanny ability to make it not rain on multi-day backcountry trips, so I do not have strong opinions on rain jackets. (Tina vs. Whittier — the wettest city in Alaska and the United States, according to Wikipedia — 1 day of rain out of 9 on three separate three-day kayaking trips. Dry rain does not count.) The lining of my old Northface rain jacket started delaminating and ripping so I bought this one because it was very well-reviewed. Will let you know what I think after the JMT.
Montbell Versalite Rain Pants – Will shred upon contact with pretty much anything. (Patched with a lot of Tenacious Tape from the one time I tried to wear them on the glacier.) However, super light and useful as extra warm layer, mosquito barrier, pants to wear while doing laundry.
Sleeping Clothes
Uniqlo Heattech extra warm long johns
Uniqlo Heattech extra warm long sleeve undershirt
Extra underwear and socks (one to wash, one to wear)
Warm stuff
Uniqlo Ultra Light Down parka – Inga Askamit, author of Highs and Lows on the John Muir Trail is a fan too. But last winter they started only selling a seamless parka and my friend’s mom who works at Uniqlo warned me that the baffles in the seamless jackets will separate after a while because they are not sewn so that jacket is much less durable.
Merino wool Buff – functions as warm hat, balaclava, ear muffs and sleeping eye mask as needed.
Hestra Touch Point Warmth Glove Liners — Merino wool synthetic blend. Expensive, but I got with a Big Sky gift card and they managed a whole season of ripping apart and applying skins to splitboard before developing any holes, which I will darn before the trail.
One 2L Sawyer Squeeze Bag for collecting dirty water
1L Nalgene Bottle – for drinking out of, and can function as a hot water bottle for cold nights, I don’t anticipate carrying more than 1 liter of water at a time for most of the trail.
2L Evernew water bag – for carrying extra water and as back-up Sawyer Squeeze bag
O-ring that came with the filter for backwashing
Contemplating bringing Aquamira for back-up, as I expect to camp in below freezing temps at some point and am a little worried my filter will freeze like last time. Of course, I know now to not filter water first thing in the morning when it’s really cold. Filter before the sun drops below the horizon and everything freezes, then put it in your puffy jacket pocket and sleep with it.
Food storage
Bear Vault 500 Bear Canister – A bear canister is required on the JMT. It is heavy and makes my pack bulge a uncomfortably. It takes up most of my pack, so as I eat my food, I will gradually stuff more and more items in there during the day. In the Sierra, bears are very habituated to people and bear cans. In 2017 when we picked up our JMT permit, we were advised by the ranger in Yosemite National Park to place our bear cans close to our tents (12-15 feet away?), within sight and to make noise and scare the bear off if one approached… Very different from bear can protocol in Alaska or Montana where there a grizzly bears. Bears are super smart and adaptable, so when in doubt, ask the local rangers what it the best policy. Bear cans are not odor proof. The purpose of bear cans is to keep bears from being able to get to your food (bulky round shapes keep bears from being able to crush them with their jaws) and in the long run train them to leave campers alone. If a bear asks to borrow a nickle or a credit card, don’t give it to him!
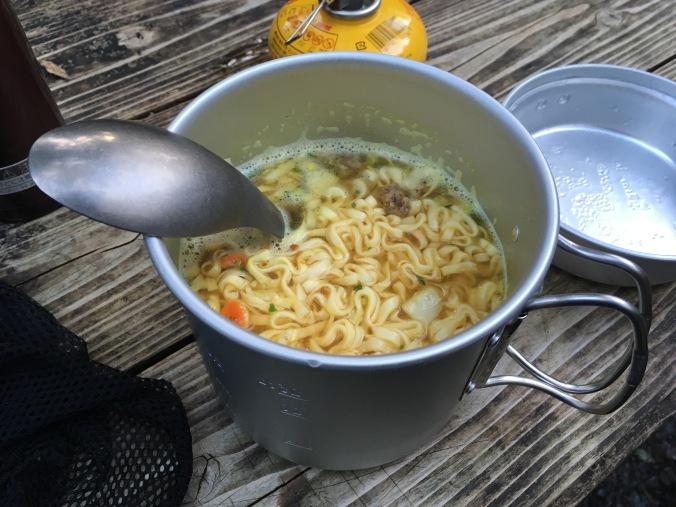
700ml Evernew Titanium Pasta Pot – I started out with a larger aluminum pot, but figured out that I am pretty happy boiling about 600ml of water for dinner and a hot beverage (coffee in the morning and tea in the evening), so I upgraded to this little titanium pot which fits a small 4 oz fuel canister.
Bic mini lighter
GSI Outdoors Long Essential Spoon, Large – NEW! Trying this out because silicon spatula sides sound good for cleaning out pot without awful scraping noise. Long spoons are popular for getting food out of the bottom of Mountain House meal bags. It looks kinda ridiculous next to my tiny pot though.
Small ~330ml Thermos – Almost lost this hitching out of Lee Vining in 2017, but had the foresight to exchange contact info with the nice English mother-daughter pair that picked us up and got it back! Was sad hiking 4 days without the Thermos, so definitely bringing it!
Shit Kit
Montbell potty trowel — It is wayyy easier to dig a proper cathole with a potty trowel than with the heel of your shoe or a tent stake, or whatever ultralight folks claim…. Doubles as extra camp spoon! I kid.
iPhone SE + charging cable + headphones – Camera and GPS.
NEW! Small GorrillaPod smart phone tripod and shutter remote – I’ll be hiking alone this time, who will take beautiful photos of me? Me! Let’s see how much I use it.
External battery + charging cable
Black Diamond Spot Headlamp – I actually hate the fancy multi-touch control of this headlamp and would rather one that just cycles through all the functions the old fashioned way, but I guess by the end of the JMT I’m going to be a pro at using this.
Extra AAA batteries for headlamp
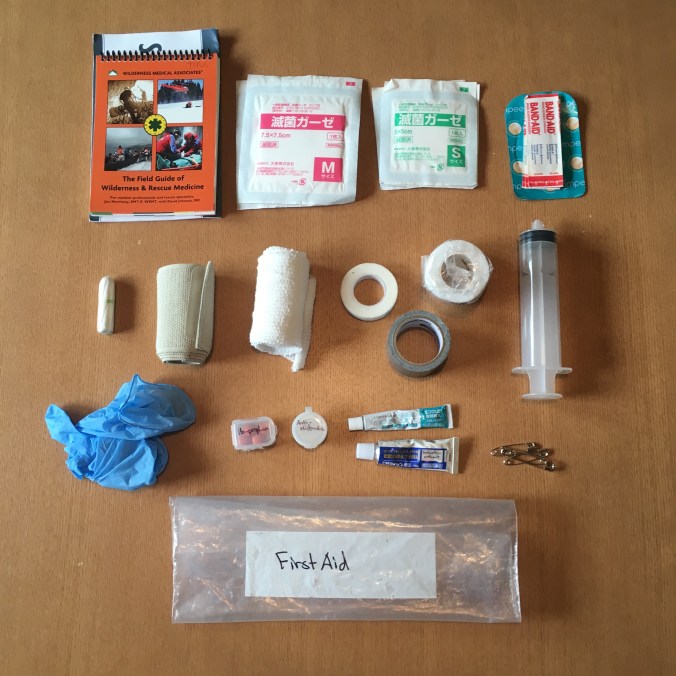
First Aid Kit
Exact contents TBD. I will be carrying stuff for blisters (leukotape), wound care (bandaids, gauze and iodine wipes), pain meds (ibuprofen and acetaminophen), and anti-itch stuff (benedryl as well as some topical-steroid anti-itch cream).
Repair Kit
Dental floss with sewing needle taped to box
Duct tape wrapped around Sharpie
Small amount of fabric repair tape (Gear Aid Tenacious Tape)
Safety pins – mainly for hanging laundry on pack, also good for first aid.
Misc. Backpacking Gear
Mosquito headnet – I’ve made it through a summer in Alaska and a summer in Montana without ever using bug spray, just long sleeves and pants and a headnet. (Not possible in muggy, hot places like Japan or Taiwan.)
Earplugs – For windy and rainy nights and if people are partying at VVR.
Swiss Army Knife
Compass
Camp towel – small microfiber towel I got from a Tell charity run
Sea to Summit ultrasil pack liner – I only bought this because there are no trash compactor bags in Japan.
Small dry bag for sleeping bag and down puffy
Crocs – Best camp shoes if you will be wearing socks.
Montbell Versalite Pack 15 – for side trails, summits, carrying stuff around camp. Like Montbell Versalite rain pants, not the most durable but super light and packable.
Black Diamond Alpine FLZ trekking poles – These poles collapse small enough to fit in my ski backpack in the winter when splitboarding and extend long enough to hold up my tent in the summer. Love them.
Wallet – small plastic mesh zip pocket from Daiso.
A few extra Ziplock freezer bags – A gallon Ziplock bag makes a great in-tent pee bottle for women, just make sure to double bag in case there is a leak. Set outside your tent door after using and empty at your leisure in the morning.
I already wrote about my gear following my Yakushima Trek (read here), but Kiwi Sig Other thinks it’d be interesting for y’all to see what it looks like and how I pack. I’m just a beginner backpacker (lifetime 3 overnight backpacking trips) and made my gear choices based on other peoples’ great blogs and Youtube videos. On the Internets, newbies often post about all their gear and ask a more experienced community for a shakedown, but I haven’t ever weighed my stuff since I don’t have a scale and I think the key is probably to get out there with all your gear and figure out what works and what you can live without.
Overview
Here’s pretty much all the stuff I brought on the Shinetsu Trail, minus food and clothing worn.
All the things in my pack for the Shinetsu Trail. How did I fit it all in there? With food, too!
From left to right, top to down- ish:
ULA Circuit pack, Sea to Summit Ultrasil Packliner (used this to protect sleeping bag and clothing from rain and also put food in here because of paranoia about bears and ants), some extra grocery bags to use as trash bags, a pair of disposable chopsticks as emergency eating utensil (I also carried a titanium spork thrown in my food bag), Montbell potty trowel attached to bag by cheap 100 yen store carabiner (also emergency eating utensil?).
Hiking poles with small draw string sack to cover tips (polite when using public transit in Japan).
Stuff generally stuffed in mesh pocket or otherwise attached on the outside of my pack: hat, sunglasses, potty kit (hand sanitizer and pocket tissues), tenugui (Japanese version of a bandana), small bottles of sunscreen and bug repellant (need better bug repellant, the stuff in the blue bottle was useless).
Stuff for camp: camp cookset, windscreen, swiss army knife, small ~300ml Thermos (this is my luxury item and I love it), Montbell Versalite Pack 15.
Water system: 1L PET bottle, 2L Sawyer Squeeze bag, Sawyer Squeeze filter, coupler for backwashing the filter.
Stuff in ziplock bags: First aid kit, electronics, toiletries, glasses. Not pictured: baggie for paper stuff. Details below.
Packed clothing: rain jacket, microfiber towel (I got this awesome sweat towel from volunteering at the Tell charity run. It is more absorbent and dries faster than a tenugui. Hit up Ben to see if he has any left…), merino wool Buff, glove liners, spare undies, spare socks, Uniqlo 100 weight fleece, Uniqlo Ultralight Down vest, Uniqlo Heattech Extra Warm top and bottom for PJs, tyvek drawstring bag used as clothing bag.
Big stuff: sleeping pad (cheap foam pad from the Amazon trimmed down with kitchen shears with four folds on the bottom separated so that the smaller section can be used as a sitting pad – Thanks for the advice, Ken!), sleeping bag, tent, tyvek groundsheet, tent pegs and cord for guylines in small ziplock. (Read more about my “Big Three” in my previous gear post.)
Not pictured: phone and minimalist wallet were carried in one of the side hip belt pockets.
Further Breakdown
First Aid Kit
I took Wilderness Advanced First Aid with WMA Japan in May (hope to finally write up a post about that experience soon), which led to beefing up my first aid kit. This is what I threw together for now.
What’s in my kit (roughly top to bottom, left to right):
WMA Field Guide and SOAP notes
a few packs of sterile gauze, blister patch and a few bandaids
tampon, ankle brace, stretchy bandage, surgical tape, vet wrap, duct tape, syringe for irrigating wounds (repurposed Sawyer filter backwashing syringe)
gloves, Advil, antihistamine, small tube of topical steroid for itchiness, small tube antibiotic ointment (I also intend to carry a small dropper bottle of iodine), a few safety pins (also good for hanging laundry on backpack).
This is a work in progress. I’ve got a swiss army knife and some other things in my pack that double as first aid tools. As with anything else in the outdoors, it all comes down to experience and your kit is only as good as your knowledge, so I highly recommend getting trained in Wilderness First Aid if you want to spend any extended period in the outdoors.
Here are some links I found useful about building your own first aid kit for hiking:
Self-explanatory: iPhone charger, earphones, earplugs, spare batteries for headlamp, headlamp, external battery that charges my iPhone 5 SE 3-4 times.
Toiletries
Self-explanatory: Hotel disposable toothbrush, toothpaste, moisturizer, contact solutions, contact case, glasses (getting Lasik soon to so I won’t have to bring all the eye stuff).
Honestly, I didn’t use that face cream until after I finished the trip and I forgot to bring lipbalm. It’s probably generally humid enough in Japan in the summer that you don’t need to bring any moisturizer, sunblock will be enough. Here’s something I read recently that provides good perspective for women on how to let go of the need to groom and look good all the time: http://www.foxintheforest.net/be-wild-love-yourself/.
Paper things
Forgot to include this in my overview photo above, because I was using the contents to write my Shinetsu Trail blogpost. I carried a book, maps, a small journal and a pen in another ziplock.
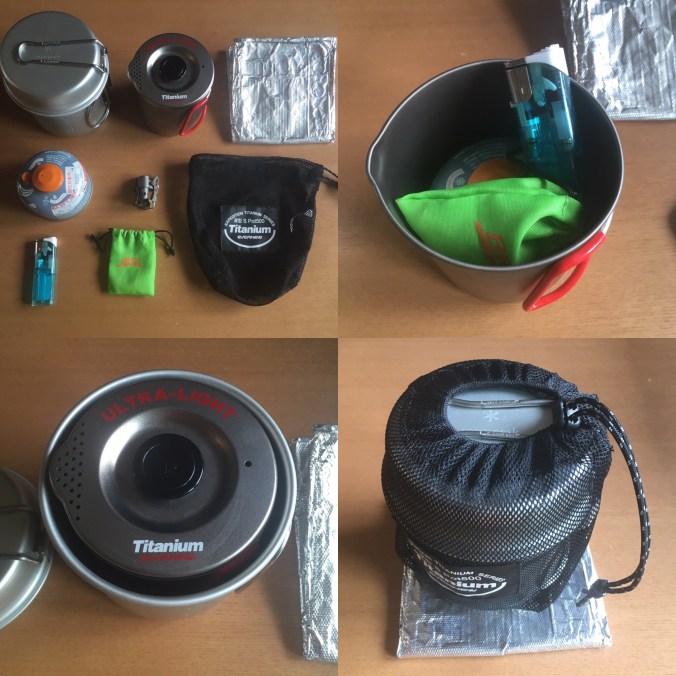
Cook-set
Playing matryoshka with my camp cooking gear
I bought a new 750ml titanium cookpot for solo-hiking, but when Genna decided to come along, I realized that now I have the perfect two person cook-set, because the smaller pot weights next to nothing and packs neatly in my old 900ml cookpot. My two-person cook-set consists of:
Snowpeak 900ml Aluminum Cook Set
Evernew 750ml Titanium Pasta Cooker
Windscreen – Aluminum tempura splatter guard (didn’t even have to cut it down, just folded it up!)
Fuel canister
Lighter (back-up matches in first aid kit)
Tiny titanium stove and stuff sack
Mesh sack that came with smaller cookpot (the smaller drawstring sack holds everything tightly together so the lid of the larger cookpot doesn’t bang around)
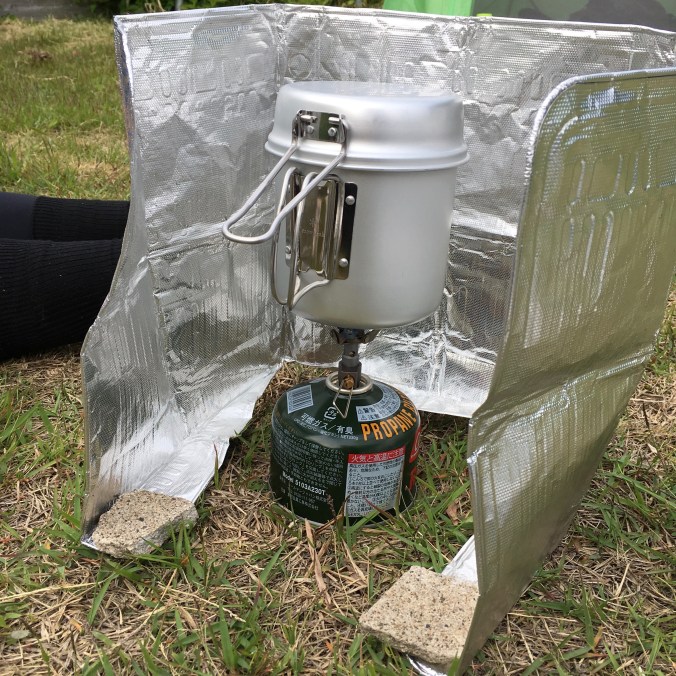
Here’s what cooking dinner looks like:
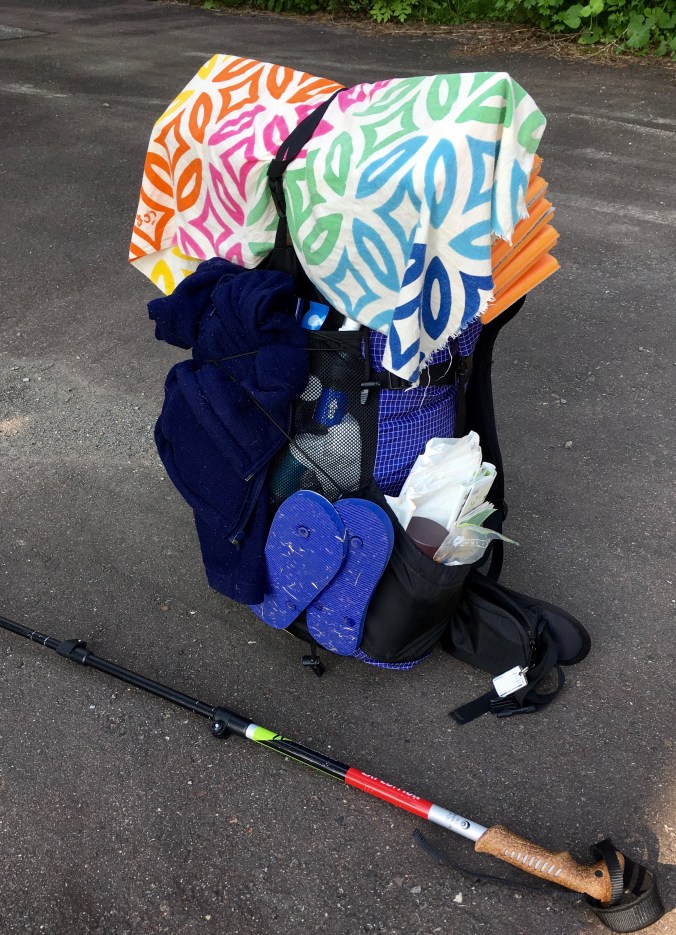
All Packed Up!
Ready to go in the morning!
Oh yeah, I actually made the last minute decision to clip some 100 yen shop flipflops to the outside of my pack. It was definitely nice to have camp shoes (especially after a swim), but they are not essential. Up in the air on whether I would bring them again.
What hiking blog would be complete without a post about gear? On my Yakushima trip, I finally got to test out my “big three” pieces of gear that I collected in anticipation of my JMT hike.
(Disclaimer: I’m testing out some Amazon affiliate links in this post. So, yeah, I’m really cool and you want to be just like me. So buy all the same things I have so I can make money and never have to go back to a desk job.)
I believe this is the most popular pack for PCT and AT thru-hikers. I met a guy at the hostel in Kagoshima who had hiked the AT and who was carrying the same pack. It comes in purple, so I was sold. I have long torso, so I ordered regular length with a small waistbelt. When I carried it back from the US it hurt my back weird and I was worried I got the wrong size. However, I moved the waist belt up as high as it will go and now it fits fine. When I put everything in the pack, it was heavy to lift, but once on my back it didn’t feel heavy. I guess that’s what you want in a pack right?
I did lose my 1L Nalgene bottle from one of the side pockets in northern Kyushu (probably from putting it on a luggage rack on the train), but aside from that functionality seems good.
This tent appealed to me because it has no tent poles and can just be squished into its stuff sack, or anywhere. Also it is very roomy for a one-person ultra-light tent (no leaving pack outside under vestibule) and at $180 + $30 for seam sealing, it was cheap compared to other tents I was considering.
Some online reviews mention condensation issues, but I did not experience any, despite the rainy and humid conditions on Yakushima (but it wasn’t cold anywhere I used it). Other reviews mention a learning curve for pitching the tent right. The tent sets up with a trekking pole and minimum of 6 stakes. I got an extra stake and guyline to create more headroom and stability in the wind. I practiced setting the tent up once in Yoyogi Park before I left for my trip. Then I had a crash course in setting it up in a thunderstorm when I got to Yakushima and then a crash course setting it up in the rain with no stakes using rocks and concrete blocks when I arrived at South Village. At South Village, the next morning I did some adjustments to pitch the tent a bit higher to make the floor float properly and get more air flow, but I never got wet and the tent didn’t collapse overnight when I just hastily pitched it in the rain. The silnylon is a bit stretchy and billows in the wind but it’s quiet (doesn’t make any slappy noises), and since I put in an extra stake for headroom, the billowing didn’t bother me at all and I slept great. I was a bit worried about it not being freestanding, but now I’m not. This is a very comfy tent for people like me who like having good ventilation. May not be as good for people seeking warmth from their shelter (but not sure any tent provides that). Due to the shape, even though this tent has almost as much floor space as many 2-person ultralight tents, most of that floor space does not have headroom, so it really is only a 1-person tent, just with tons of room to spread out your gear.
If I buy a two-person tent in the near future (so Kiwi sig other can join me on some adventures), I’m considering the Tarptent Double Rainbow just because I like the name. I aspire to reach this level of stoke in the outdoors!
Perhaps my greatest enjoyment in life is sleeping, and this quilt is so light and warms up so fast it’s like sleeping in a cloud. I used this as my primary comforter all winter in Nozawa, when I figured I’d practice living without heat. After the first night in Shintakazuka Hut, I woke up and put on my still damp hiking clothes from the day before. I didn’t feel particularly cold even though I could see my breath in the darkness of the hut. Later in the day chatting with other hikers who had stayed at Shintakazuka, they complained it had been cold at night and that they had to get up and put on more layers. I wore a normal cotton T-shirt and some Uniqlo Heattech Extra Warm tights as PJs. I was never cold, so I guess my quilt worked great! I’m going to get a thermometer so that in the future I actually know how cold it was to gauge whether this sleeping bag is sufficient for the Sierras in early October.
The quilt was great for a place with climate as varied as Yakushima. Camping at subtropical sea level, I could unzip it flat and just put a corner over my belly. Here’s a great video about why quilts are better than sleeping bags:
All my campsites were flat with no pokey things, and I was pretty comfy. With my superpowers of being able to sleep anywhere, I can even side sleep on a cheap foam pad. Listening to people blow up air pads and have to faff with deflating them in the morning at the huts makes me think I will just stick with a foam pad. It was also super convenient to just throw down and mark my spot on the ferry.
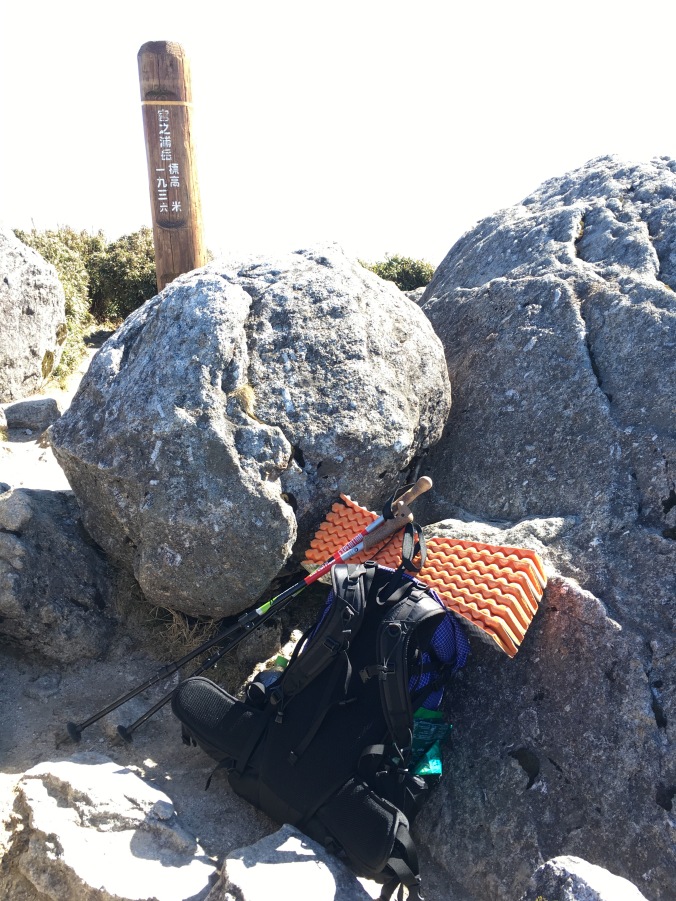
The only annoying thing is having a bulky thing strapped to the outside of your pack when the trail is super narrow and overgrown and you have to climb under trees or out of holes like on the Onoaida Trail, and I’m thinking of chopping it down a little so it packs better.
Footwear
I hiked in my Brooks Cascadia trail runners, partly as an experiment and partly because I was travelling to Yakushima following a yakimono tour in northern Kyushu and clomping around in hiking boots would’ve been annoying for the other part of my trip. The good thing about hiking in trail runners was that Yakushima is really wet. Because most of the island is a giant piece of granite with a thin covering of soil, wherever there is trail, there is likely water running down it. The hiking your shoes dry thing advocated by Andrew Skurka really works. When I pulled into camp early the second day, I put my shoes in a patch of afternoon sun and they were completely dry in less than an hour. On the other hand, on the third day, going down the treacherous Onoaida Trail, my ankles really suffered from lack of support.
The tiny no brand Made in China stove worked great. I came up with a routine to boil 600ml of water at dinner and breakfast. I would pour 300ml into my little Thermos for a hot drink (coffee in the morning, herbal tea at night – actually one night I made umeshu oyuwari from some homemade umeshu generously offered to me by another hiker) and then use the remaining 300 ml for the hot part of my meal (instant ramen at dinner, two packs of instant miso soup for breakfast). So I’m now considering upgrading to this 700ml titanium cook pot.
Clothing
I brought way more clothing than necessary, but I used everything.
My basic hiking outfit was:
Long-sleeve Kathmandu merino wool hiking shirt (purchased in NZ)
Uniqlo Heattech leggings
Synthetic capri sweatpants I bought for bouldering
Darn Tough hiking socks (I wore through my two beloved pairs of Smartwool hiking socks over the winter so I replaced them with two pairs of Darn Tough socks to see which brand is more durable.)
A Gap sports bra and some synthetic sport underwear from Target
For outer layers I had:
Mountain Hardware fleece – This thing is pretty heavy, but very warm. Kiwi sig other purchased it for me secondhand from a gear exchange shop in Colorado Springs. I could’ve brought my Uniqlo ultralight down parka instead, which would have been lighter and less bulky for similar warmth, but I considered that Yakushima is really wet. I rolled this up at night and used it as a pillow, and for that use I was grateful for its bulk.
North Face lightweight rain jacket – Debated bringing this or a real Goretex hardshell. But lightness and packability won out. I was blessed with amazing weather so didn’t end up regretting my decision.
Uniqlo ultralight down vest – Extra puffy layer just for camp.
On the first day of hiking, going upward in elevation, I was really sweaty when I showed up at camp and couldn’t wait to get into dry camp clothes. (In the morning, putting on cold, damp hiking clothes was fine; they warmed up and dried right away when I started hiking.) The second day, hiking at high elevation, I didn’t get sweaty and probably would’ve been fine sleeping in my hiking clothes. But all in all, I think I’m going to be a hiker that carries PJs. The sleep comfort is worth it!
Other weather protection:
Baseball cap – frontwards for sun, backwards when no sun (totally hit my head on a tree branch that was obstructed from my view by the brim)
Merino wool Buff – I like to wear this as a light beanie; it was needed for covering ears when hiking above tree line where it was really windy
Snowboarding glove liners – Gloves were needed above tree line. These cheap Mizuno “breath thermo” ones really do stay warm when wet. However, they totally get destroyed by velcro on my snowboard jacket, snowboard boots, etc. Not a problem for hiking, fortunately. (I also have a breath thermo balaclava which I really like because it is really thin and doesn’t get too wet and gross when you breath through it.)
Onsen kit: (That’s right! A third set of clothes! Totally not ultralight hiking! Brought this stuff in anticipation of having two chill days at the hostel.)
Extra underwear and sports bra
Extra short sleeve synthetic t-shirt (I actually had two extra t-shirts so that in case I ended up hiking in a short sleeve shirt I’d still have a clean shirt at the end.)
Extra tenugui to use as towel
2 sets single use packets of shampoo and conditioner
Shea body butter
Other
Water system – Sawyer Squeeze Water Filter and one of the 32oz bags that came with it. I used a 1L PET bottle as “clean” drinking water bottle but cooked with unfiltered water out of the Sawyer Squeeze bag. With this set up, I could carry 2L of water, which I never did except at camp. I carried about 500ml when I was hiking, but frankly, you don’t have to carry ANY water on Yakushima. It’s flowing out of everywhere. And no one was filtering the water either. I just filtered to practice using my filter. (Monkeys and yakushika were hanging around near the huts and I’m sure pee and poo in the water sources so…)
Trekking poles – I would have died on Onoaida Trail without trekking poles. I have PaceMaker Stix Expedition Trekking Poles. Not the lightest or most compact, but they have flip locks and cork grips and cost less than 50 bucks.
Toiletries:
Tsubaki (camellia) oil doubles as face oil and hair product – Luxury item! (I use this face oil made by the agriculture union on Toshima, one of the Izu islands that looks like a little cupcake floating in the sea. Why pay LVMH for a brand name when you can get it straight from the producer way cheaper. It also makes cool Tokyo omiyage since it’s technically a product of Tokyo.)
Toothbrush and toothpaste
chapstick, sunblock
Potty kit – Hand sanitizer and 2 packets of pocket tissue (also had to use pocket tissue to wipe down cook pot, as you’re not allowed to wash your dishes on the trail)
Glasses, contact case, contact solution – I want to get Lasik.
Other camp goods:
headlamp
eye mask and ear plugs – Used ear plugs to block out thunderstorm the first night, probably don’t need eye mask on the trail since everyone sleeps when it gets dark and wakes up before light but may need it for travelling (hostel/ferry) so will probably still carry it.
first aid kit (advil and antihistamine, electrolyte tab, bandaids, blister patch, ankle brace)
Swiss army knife – not used, but good idea to have right?
journal, map and pen
nylon eco-bag – I used this to carry stuff around camp. I want to replace it with a tiny, ultralight backpack like this one so that I can use it to carry water and some essentials when I drop my heavy pack to go off on a side trail.
Some extra ziplock bags and trashbags to keep things dry in case it rained
I feel like gear wise I was very prepared. The first night I pulled out my headlamp and it wouldn’t turn on, but I was prepared with spare batteries. After this hike, the only things I would add to my kit are a thermometer, a proper orienteering compass (I have a crappy one stuck on my key chain), and a small packable backpack. As a final note, on the way back to Tokyo, Jetstar let me check my pack in (on a domestic Japanese flight) with my sleeping pad and trekking poles just strapped to the outside. (I left my fuel can and lighter at the hostel along with my unused wag bags for the next hiker.)


 Forgot to include this in my overview photo above, because I was using the contents to write my